Showing posts with label DIY. Show all posts

Sep 3, 2015

YOUTUBE THURSDAY: Jordan tells us how to do a braided crown

Jordan aka JuicesAndBerries on YouTube
I love stumbling upon a YouTuber that is just so fly! Because, listen, when you are looking for an amazing tutorial that just enhances your life, you got to tell your friends. So, you guys are my friends, and I want to tell you about Jordan McCrary, aka JuicesansdBerries

I've been looking for and EASY Flat Twist Protective Style to rock during this hot weather. Jordan's video makes it SO easy to do this style while using Marley hair. This flat-twist style is super popular, probably because it's a DIY that's almost anyone can do. 

So, you guys, go support Jordan. She makes really great videos and has lovely product reviews. Her blog, www.imjuicesandberries.com, it's easy to read and super cute! Take a look at her video, below, be inspired to rock this cute style.

Oct 31, 2014

Roots + Rhythm: Stevie Wonder - "Superstition"

Here's the thing about Halloween: for most people who enjoy the day, the reason why never really changes from childhood.  To me, its all about (candy, of course) creativity.  I don't really remember any of the store bought costumes from my youngest years, but I do remember spending hours thinking of what I could create with what was in front of me as I got older.

Miss Charmsie's Zebra DIY.

And for most adults, that does not change.  For themselves and for their children, adult Halloween fun is most often about the costume creativity.  For people who love to express themselves through their clothing and accessories, Halloween is a time to express the fullness of their imagination.  Just as we did when we were children.

Miss Charmsie as Michael Jackson
We've seen some pretty impressive costumes from some our favorite bloggers over the years, but Miss Charmsie really did it for me this year.  Her YouTube channel is full of DIY tutorials all year long, but her Halloween tutorials are a perfect example of the creativity I love.

I loved her take on Cruella Deville, but her recreation of Beyonce's promotional art for The Mrs. Carter Tour is amazing.  From hair and makeup detail to recreating the outfit, I love seeing the creation process.  I'm pretty sure you can make anything beautiful with a hot glue gun and crystals.  And I love people who understand that.

Miss Charmsie as Mrs. Carter
So, how creative are you if you dress up for Halloween?  Do you go all in?  We'd love to see your costumes this year!  Don't forget to use #NaturalInNash to share!

Whether you celebrate or not, here's to recapturing the imagination and joy of youth! And to a sweet interview and jam session with Stevie Wonder on 'Superstition" from Soul Train 1973. (Performance at 3:25)


Jul 8, 2014

PRODUCT REVIEW: DIY Flaxseed Gel

One of the things I am very conscious of with my loc renewal is product build up.  I really do feel like I have a new set of locs and that allows me to do all the things "I wish I had known".  I've worked with flax seeds before and can easily see how the gel they produce could work to maintain locs without leaving a lot of build up behind.

Flax seeds via thehealthsite.com.


I used the tutorial by @Locrush as a guide after a quick exchange with her on Instagram about the process.  I made three batches before I finally had one I felt comfortable using on my hair.  When I considered the size of my locs and how much I would actually need to hold my locs in place, I felt like the first two batches were just too thick.  My remedy was to reduce the boiling time of the seeds and allowing it cool into a thinner gel.  It worked well and third time was a charm.


By creating a thinner gel, I'm hoping to reduce the chances of having any extra product left behind.  It seemed to work better than I thought because I wasn't looking for a really tight hold, I just wanted to create some control with some of the new growth.

For me, the most challenging part was straining the gel.  I used the same process demonstrated, I do think you're only as good as your tools in this step of the process.  I don't think the tongs I used were wide enough to really squeeze the gel and it didn't go as smoothly for me as in the video.  The seeds produced more than enough gel, I just couldn't squeeze it all out.  This is a process that definitely has to happen while the gel is warn as shared in the tutorial.

DIY Flaxseed Gel
I decided not to add any honey or oils until I nailed the right consistency for me, so I may explore the oils soon and pass on the honey.  DIY flaxseed gel is a win for me!

Apr 3, 2014

Natural In Nashville: Whipped Shea Butter Recipe


While I was at the meetup, more than one of you approached me because I said that I can be found in the kitchen, whipping up my own styling and moisturizing products. This is true, but you wanted recipes. I mean, of course you wanted recipes.

I was almost sure I posted this recipe a while ago. But apparently that post went to live in Lost Blogville. But better late than never, right? For those of you who were wondering, here is how I make my whipped shea butter. I'm going to let you know a few things in advance:
  • I'm not one who measures. I just eyeball how much looks right. Everything in this recipe is an approximation. It can be adjusted to fit your hair needs. But feel free to leave questions below.
  • Mixing this can be messy if you're using a blender. It can be hard to mix thoroughly without a blender. Pick your poison.
  • If you are a young reader, ask an adult for help.
  • Also, this is a mix that I use. You're totally free to customize it to fit your hair needs. If you are allergic to anything, or decide to use this mix in any way other than an external hair and body cream--- Please don't use it.

Now that those disclaimers are out of the way, go grab some items and get ready to mix! You'll need:
  • A mixing bowl
  • Electric Mixer
  • Rubber Spatula
  • Raw Shea butter
  • Vitamin E oil
  • Aloe Vera (juice or gel)
  • Coconut oil
  • Your choice of essential oils
  • Container with lid

As raw as it gets! I get my Shea butter from Gateway 2 Africa
Although it's not a necessity, you could make this mixing process go really fast by popping about 1 cup of the raw Shea butter into the mixing bowl, and then microwave. I'd say go about 15 seconds at a time until the butter is solid, but soft enough to mash down the middle with a spatula. It shouldn't take long. Next, add about 2/3 cup of coconut oil. Grab the electric mixer and blend. 

Add 1/3 cup of Aloe Vera juice. Mix it again until everything is well blended. At this point you can let the mixture sit for a bit and begin to firm up. Once it's the consistency of brownie batter, you can add the remaining essential oils and vitamin E oil. I like to use peppermint, tea tree, and a dash of lavender. I also like to add a fruity fragrance oil that compliments the peppermint oil. 

Add the ingredients to your container, and cover with a lid. Since all of  the oils are non-perishable and act as a preservative, this mixture can keep for months. So try it, and let me know how you like it. Also, my mixture was inspired by Naptural85. You can see her video for the mixture here.

Do you have your own mixture that you use? Share your kitchen-made miracles in the comments below. And if you try this recipe, let me know how you like it.

Dec 24, 2013

CHRISTMAS WISHES GIVEAWAY 2013


It's that time of year again! Usually, we do 12 Days of Christmas -but WHOA, this month flew by fast, I didn't get a chance to run the campaign the way I'd like. However, we couldn't end the year without doing an awesome giveaway!

The writers and I decided, we'd share some of our favorite products that we discovered this year. As your natural hair journey changes you'll realize that you start to use different products. This gift basket is filled with more than $150 worth of beauty products - all handselected by the staff of Natural in Nashville! Scroll below to read SOME of the items featured in the basket (we are adding new things everyday!
a Rafflecopter giveaway


From Ashiya: Paddle Brush + Nature's Blessings Pomade
The best thing I did for my hair all year long was purchase a paddle brush.  Every time I use it, I ask myself how I made it this long without it.  After moisturizing my scalp, I use the paddle brush to massage product into my scalp and to encourage hair growth by stimulating my scalp.  While the goal is to strengthen my roots and ultimately my locs, I am driven by instant gratification.  I live for those massages now.  After years of trying to remedy a dry, itchy scalp in winter, Amber's advice was perfect. After hearing a few of my favorite naturals rave about Nature's Blessings Hair Pomade, I decided to give it a try.  While it has not become my go to daily, I do use it often.  While I still need other oils to maintain moisture balance,  I appreciate the softness Nature's Blessing brings to my new growth which allows my locs to free form with a bit more ease.  

For years, I've worked on finding the right combination of shampoos for my locs.  After a little more education on hair health this year, I may not have found the ultimate, but I have found a new staple.  Shea Moisture's Raw Shea Butter Moisture Retention Shampoo is one of the shampoos that naturals happily share with me often, so I gave in when Walgreen's had them on sale earlier in 2013.  I gave in to ALL of them, but the Moisture Retention Shampoo was consistent despite the cleansing shampoo I used.  A quick wash and my locs are back to their best.  For now, this one is official.  


Dudu Osun Black Soap
If you've ever considered trying black soap, I've had my best experiences with Dudu Osun.  Some black soaps tend to leave my skin feeling stripped as opposed to clean, but I have not had that experience with this one. Made with natural plants and herbs, I initially intended to use it as a facial cleanser but immediately began using for total body because of that quality. Another reason I love it is because its easy to find at most local stores that carry shea butters, oils and other natural products.


From Candice: I'm putting in some homemade shea butter mix. It's the bomb. Hair. Body. All of me loves all of ingredients. Great for winter, but I made it a little lighter just in case the winner doesn't like weighty products. I love it because natural works better for me. And I made sure it smells amazing because... Why not?


Also, I'm giving awesome MetaGrip Bobby pins.  Regular pins are flimsy, and leave paint flecks in your hair. And it can take so many to hold up a style. And those little balls on the end peel off.  These pins are like super woman. Everyone should have some.


From Melissa: One n' Only Restorative Mask - I LOOOOVE this conditioner. I use it all the time when I've been neglecting my hair. It's super thick and makes your curls and coils BOUNCE back. I was introduced to this product when I got my hair done at the salon. I swear when you use it, after shampoo'ing your hair will thank you. Click here to read my full review.


Aphogee Moisturizing Shampoo - I've been using this shampoo since I had a relaxer. But don't let the 'r' word scare you. This deep moisturizing shampoo is AWESOME for nourishing you hair as you wash it. And sometimes, you really need to wash your hair and get it squeaky clean while moisturizing your situation. I hope you love it. Read my full review here.

From AmberConfixor from Aveda. It's a liquid gel that mixes well with other products and essential oils and provides strong definition to medium texture hair.


Aveda's Daily Hair Repair it acts as a heat protectant and leave in and rebuilds compromised hair.

Of course you'll get an Official Natural in Nashville t-shirt! Let the people know where you get all your info from! LOVES IT! Purchase more shirts here!


Dec 9, 2013

Ashiya's Hair Diary: Happy New Locs! Happy New Year!

As I look forward to a new year with the feeling of new locs, I can't help but think of the new maintenance plan Amber and I developed after she colored my locs.  There are a few new professional and DIY products I wanted to try and this seems to be the perfect time to work them in.

A silly moment, but a great loc shot.

The most pressing goal for next year is to offer my scalp more love and attention.  At this point in my hair journey length makes strong roots a must.  While I had a regular appointment with moisturizing my scalp, adding the paddle brush has changed my life.  It is the perfect quick massage.  I also noticed my scalp felt more relaxed in between scalp treatment and received oil better.

I first read about herbal rinses last year when Esosa Edosomwan shared her hair routine with Loc'd Life Magazine.  After a little research on making them at home and application techniques, I'm looking forward to adding them to my routine.  Using the herbal rinses should help keep my locs fresh and clean while I allow them to free form.

Rosemary: One of the herbs I plan to experiment with in herbal rinses.


The last thing I plan to do is up my scarf game.  Candice's discussion about forgetting her scarf made me realize my current choice is really not my best choice.  I have a beautiful silk scarf my Aunt gave me a few years ago that I rarely use.

"Now I lay me down to sleep, I pray my tie in this scarf will keep..."
I'm sure she didn't intend for me to use it to protect my hair, but she would be happy to know I use it everyday as opposed to every now and then.  I just have to figure out how to tie in place.  I'll keep you posted.


Dec 5, 2013

LINK LOVE: Face Oil recipes for DRY winter skin


OH-EM-GEE! This weather is making my my skin dryer than a sheet of paper! I've always had dry skin on my body; dealt with eczema as a youngster. So, I'm well versed on slathering on the oils and moisterizers on my body. And of course, if you're BLACK, you know not to leave the house ashy! LOL!

However, my face, my precious face! I've always had normal/oil skin on my face, but now as I've gotten older, my face is DRY! Like, ashy face, dry! NAW SON! So being the 'natural-ish' girl that I am, I started combing the internet for simple, homemade, face oils to help me deal with dry skin. Because, knowledge is power, I thought you'd like to know the great article I found about making you own face oil.

Of course, you can buy designer, pre-made face oils but creating you own allows you to find a combination that will work well for you. Check out this article on Crunchy Betty where she helps us using three oil-based ingredients to make the best face oil for you dry skin:
" . . . before those of you with oily skin run away, let me tell you this: Do not be afraid of oil. It is your friend. ESPECIALLY if you wash your face with something that strips your natural oils. Replacing those oils with something nourishing should make your face very, very happy (and potentially less oily and blemishy)." - Leslie aka Crunchy Betty


Apr 8, 2013

Melissa's Hair: My hair for Nashville Fashion Week

Last week I was invited to report on Nashville Fashion Week (NFW). Since 2010, Nashville Fashion Week has presented local and national designers to our fair town. The proceeds benefit The Community Foundation and help upcoming designers present their vision to the world by starting on our small stage.


As a fashion blogger and wardrobe stylist I always work hard to present have cute wardrobe options to my readers as I attend various events. Now, that I write about natural hair, I wanted to make sure that I presented several hair options for you, my Natural in Nashville, readers.

Many times, women don't let go of the relaxer because they think there aren't alot of styling options available for women with natural hair. Most of the time, women aren't comfortable exploring their new style and have fear that people will make fun or think they look 'crazy' when they rock a different look. Don't let your hair lock you in a cage of emotions and fear.

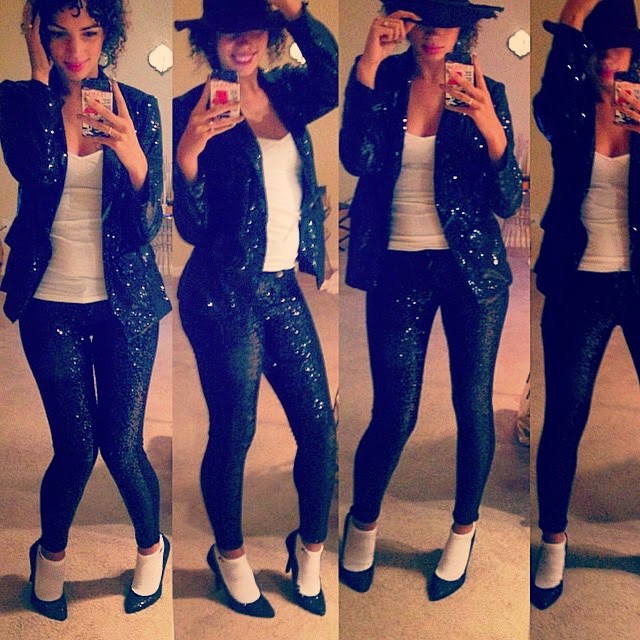
Below are several hair looks I rocked for Nashville Fashion Week. I hope you are inspired to try a new style.

Day 1 - After coming straight from a family vacation, I went right into NFW. My hair was a shrunken mess and I had no time to wash and deep condition.  So I rocked my 'go-to' style - the Marley Bun. I have a Marley Bun tutorial on our YouTube page - click here. Basically, I pulled my hair into a ponytail then attached the Marley style braiding hair to my hair giving my bun more volume and finesse. Everyone love it!


Day 2 and 3 - Now into the swing of the week, I knew I didn't want to manipulate my hair too much. I went to my local hair store and purchase a half-wig or fall. This is a synthetic hair piece created by FreeTress (style - Creta Girl, color -1B). The piece was really long, so I cut it to bob length to allow for more volume. Underneath, I washed and conditioned my hair then put my hair in flat twists to protect it. I left the bang area out. Using wigs or falls is great way to switch up your look. I used a little water and mousse on my bang area to help my hair blend into the curl pattern of the synthetic hair.

Day 4 - It wad time to switch the style up again. This time I wanted to go for a bold dramatic look because the runway shows were bold and dramatic. I pulled out my old african print fabric that I purchased from the African Street Festival in Nashville. I fashioned the fabric into a high bun and went on. This was the easiest style and my hair stayed protected under the scarf/turban. Click here for a quick/easy turban tutorial on YouTube.


Day 5 - The last day of NFW I was tired yet excited. I made through a whole week and now I was done. What to do with my hair? I finally released my hair from the flat-twists that I rocked under my half-wig and my turban. My hair had great volume so I used two hair combs on each side of my hair and fashioned my hair into a Mohawk. For a bit more dramatic volume, I added some clip in extensions. The extensions are DIY and I used Jazz Water synthetic hair by FreeTress

So there you have it! The four ways I rocked my hair for Nashville Fashion Week. Fun, flirty, elgant, and free, I was able to exhibit various styles for each night.

Mar 22, 2013

Link Love: Alex's Peppermint Hair & Body Pudding


You know the NIN team are fans of whipping up our own body butters and hair balms. After last month's post teaching you all about carrier and essential oils, you should be well versed in mixing up your own recipes. Whipping up your own butters and hair oils helps with the cost of buying all those expensive designer products.

The Good Hair Blog


I was reading one of my favorite natural hair blogs, The Good Hair Blog, ran by blogger Alexandra when I came across her recipe for peppermint hair & body pudding! OOOOOH WEEE!! I cannont wait to try this!

The recipe mixes Shea butter, peppermint oil, coconut oil, manuka honey, and jojoba for a pudding like product that can be used from head to toe. You know I'm headed to Ebay to buy these products and get to mixing! Click the link below for the recipe.

Alex's Peppermint Hair & Body Pudding

Mar 18, 2013

Ashiya's Hair Diary : Self-Care Rules

This week, I've decided to give my hair some extra love.  Spring will arrive this week so its time to begin my shift to my warm weather regimen.  Normally, this would include switching oils and adding in an extra wash during the week to balance workouts, but this year I'm doing a bit more.

I started out this month with The Organic Beauty Detox designed by Holistic Beauty Advisor and Celebrity Make Up artist, Akua Auset.  Although the detox is a physical protocol, it also extends to reviewing beauty and household products in my home that may contain toxins.
Akua has definitely helped to increase my consciousness and helped me realize its really a matter of making a few simple changes in where I shop and what I should be looking for in products. While it was a challenge to just throw out full bottles of product I already own, picking up a new bottle of shampoo was no problem at all!  I decided to go with a classic: Dr. Bronner's Pure Castile Soap I picked up at Target.


I have some avocado that may go bad before I can eat them all and since I consider that a crime against nature, I'm going to whip up an avocado mask for my hair.  I've seen varying recipes, but I'm going to keep it simple and smooth out the avocado with some olive oil.  I plan to run it through my food processor to avoid rinsing out small chunks of avocado later.  For a simple recipe, check out the one I'm using here.

While all my avocado mask is marinating, I'm going to try my hand at a DIY green tea mask.  Akua posted a video sharing a bit of her self-care routine and her results from the green tea mask were lovely.

When I'm all done, I think I want to welcome spring in curls.  Curling my locs is one of my absolute favorite ways to wear my hair and I've tried every technique I've seen to achieve them.  Nothing gives me perfect curls - or frustration - like flexirods, so I'm going to suck it up and go in.   I'm so tempted to try the Curlformers.  If you know anyone that has used them successfully with locs, shout them out!


I'll update with pictures of my perfect curls (fingers crossed) and reviews of the hair and facial mask when I'm done.

Don't forget to schedule and plan your own self-care this week!  

Feb 18, 2013

Ashiya's Hair Diary : Break Up to Make Up


African Healing Oyl from Black Earth Products by Taliah Waajid
One of my absolute favorite products is the African Healing Oyl from the Black Earth Products line by Taliah Waajid.  After I finished the last bottle, I decided to explore some other oils on the market.  Every time I return to the African Healing Oyl, I ask myself why I left.  While I found some oils my hair appreciated, none of them impressed me like Taliah Waajid.  My hair LOVES this oil and I think I know why. Over the next month, I will be doing a beauty detox that will change my hair routine.  My goal is to use the most natural, holistic products available on a consistent basis.  As I rebuild my foundation for wellness and beauty, I plan to make many of my own oils and butters.  While deciding what will work best for me, I looked at what works already.

I would love to keep the African Healing Oyl in my regimen but if it has to go, I think I'll keep the Kukui Nut Oil.  It is one of the ingredients listed that I have not found in other oils I've used and may be why this oil works so well for my hair.  I also looked at the product description on the bottle and realized I had experienced each one: 

Eliminates Dryness - While everyday use is enough to elimate dryness for me, I also love to use it for hot oil treatments.  I always experience a noticeable difference in the look of my hair and tend to use less oil between shampoos.

A Kukui Nut Lei I got on vacation in Hawai'i.
Coats Hair, Adds Sheen - I think this is the biggest benefit for me.  Some products add sheen, but it feels superficial.  The African Healing Oyl is slightly thicker than most oils, which may be why it adds a lasting sheen.

Softens and Moisturizes - I usually use this oil for a hot oil treatment if I plan to loc my hair afterwards.  It does soften my hair, making it easier to handle during the process.

Total Hair + Body Oil - Although I use it for my hair most often, I have used the Healing Oyl as a total body oil in the past.  I find it more useful during the winter because I prefer a lighter oil during warmer months.

Stay connected as I explore holistic DIY tips and product for hair and body.  I would love to hear what works for you!

For more on clean eating and creating holistic self-care plan during my detox, connect with me here.

Related Posts Plugin for WordPress, Blogger...